As I get questions about the latest build and DesignShine in general, I will be addressing them here, so check back often! If you have a question, or suggestion for info that needs to be readily available in this list, please let me know!
Q1: Neither of the lights come with a "standard" battery? Is this normal, and what kind do I need?
A1: Yes, starting with build #4 (the lights on this store), the default expected battery is a 7.4V li-ion pack, which needs to be purchased independently from the light, and I have partnered with Action-LED here to make some good options available to you straight through the store (see "batteries" link above). Most bike lights with external packs are now using 7.4V li-ion as an input source. Any of your existing Magicshine packs will work, similar to some of the packs that you'll see on the "batteries" page, which will all plug-and-play immediately. Other manufacturers' 7.4V packs will also work, but may require an adapter (check the "accessories" page, link above).
Q2: I have a battery pack already, but I think it says "8.4V." Will this work with the DesignShine lights?
A2: Yes! Because of the "nominal" vs. "maximum" voltage ratings on the li-ion cell, some packs may be "labeled" according to one standard or the other, but they are one in the same (i.e. two li-ion cells in series). The larger capacity packs still have a voltage equal to two cells in series, but now each one of those "cells" may be two or more physical batteries in parallel.
Q3: It's not immediately obvious how to mount these lights. Do I need to buy a mount separately?
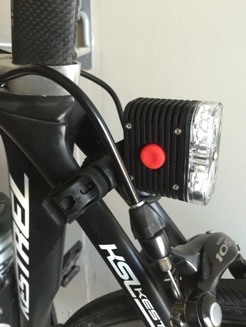
A3: The DesignShine lights have been adapted to use Cateye's clamp, quick-release mounting system. Each light comes with it's own mount, but you have to specify the size when ordering. The standard size (H-32) will mount on any primarily round tube from about 11mm to 28mm diameter. The oversize (H-31) will handle the oversized handlebars and seatposts (31.6mm), but in general it will handle anything between 28mm and 32mm diameter (again primarily round).
Q4: Can I get additional mounts for multiple bikes?
A4: Yes, they can be had on the accessories page, and it is highly recommended that if you want to use the lights on multiple bikes that you should have a mount attached to each. It makes for super easy quick-release transfer from one to the other.
Q5:What about aero seatposts?
A5: Aero seatposts are problematic for sure. In almost all cases, if you have an aero seatpost, you'll need to take advantage of the seat-stay mounting options, similar to this...
Q6:I can't get the light into flashing mode! (Alternately: "What the heck is this Superlock thing anyway, and how can I get rid of it!")
A6: For safety and liability reasons, all the lights ship with the "Superlock" safety turn-on sequence enabled. Starting from the OFF position, this requires three short clicks (click-click-click) to turn the light on in steady mode, but for flashing (again starting from OFF), it requires two clicks followed by a click-and-hold (click-click + click and hold). The timing can be a bit tricky till you get the hang off it and the user's manual will show you in greater detail. However, if you want to learn how to disable/enable Superlock OR if you just want watch a demo of the light being turned on into steady or flashing mode, watch this video now.
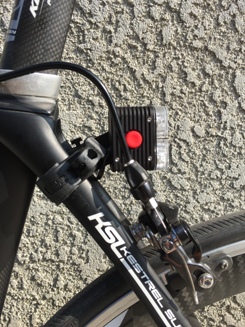
Q7:I see how one lens creates a spot beam and the other creates a flat horizontal beam, but what if I need to mount the light horizontally?
A7: The clear lens cover is designed to be taken off by removing the single screw between the two lenses. Once you have the cover off, you will need to remove the two lenses and swap their positions. In other words, the left lens is now on the right, and the right lens is now on the left. In the process of doing this, you will want to make sure that the elliptical lens is oriented such that its ridges are running VERTICAL to the ground for the given mounting orientation. To go back to a vertical mount, you repeat the process. In general, however, this is not something that I would recommend doing on a routine basis.
Q8: Can I modify the default flash patterns? And if I screw up can I get the old ones back?
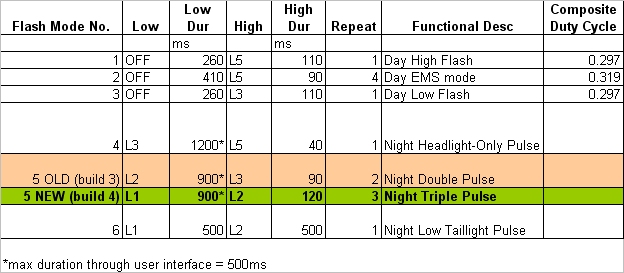
A8: Yes, and yes. Once you learn how to put the light in programming mode (question six), you'll need to go to the programming manual and check out section 8.14 (page 29) for the details on how to do this. Below is the table of all the default settings for build #4. Note that the longest delay times achievable through the user interface are 500 ms (50 clicks), so flash modes 4 and 5 are unique in that respect. To restore the original flash patterns, you need to go to menu #10 and perform a simple factory reset.
|
|
|